
This seems like the easy part of creating an invention center – you just get the supplies you need. The thing is, without a method to the madness, it’s just madness. So here are three plumb line questions to keep you stockpiling instead of just making piles.
Does the material fit into the goal of your invention center?
I know I haven’t brought up the term “goal” in the context of your invention center before, but if you’ve come this far, you probably have a good idea of what yours is already. (If you haven’t read the first two posts on creating an invention center, you can read what it is and Part 1 to get caught up.) If you’re woodworking, you’ll need wood, screws, a drill, etc.
This is the no-brainer stuff to have around. Without a stocked area, you’ll get bogged down looking for that lost paintbrush or copper wire. This is why we’re making an invention center.
How much do you need to get started?
Sometimes the zeal to create can take over, and you end up with a lot more than you need – especially if it’s freebie stock. Like toilet paper rolls. There are tons of art and engineering projects you can do with toilet paper rolls. But if you keep saving and don’t use them, well it can just start to get weird.
There has to be a FULL point. Then move on.
Did you throw a wrench in your plan?
If the answer to the last question is “nope” – then it’s time to find that wrench and throw it into the stockpile! Hear me out on this one. If you want to create a maker’s space, that’s great, but this is a defining moment for your invention center. You want to have something in your invention center that challenges you to break the mold. More than something. A fair lot of things. An acorn from last fall’s hike. A bunch of rusty nails. One red sock.
These are the grains of sand that help your creative oyster make a pearl.
Until next time,
Invent your story
In my previous post, I promised to keep you updated on my invention center. Here’s my update: progress was slow. Why? I thought a lot about how to move forward with the space I have. Maybe I’ve been overthinking it. So, without further ado, here’s…
Tip #1.
Don’t Overthink It
Underthinking things in life (Can I afford this? Should I jump?) can get you into trouble. But overthinking is its own beast. Analysis paralysis is a real thing, so if you keep coming back to a space you have to work with and thinking, “That’s probably the best place to start…” it probably is.
That said, here are four more things to consider before making that final decision:
Tip #2.
Consider the Nature of the Work
If it’s electronics, you’re going to want a table and a nearby outlet. If it’s painting, an easel may be your best option. You also will want to consider the kind of floor you’re on. I want to do a little bit of everything and not destroy anything, so I went for a corner of our basement where the floor is painted concrete and an outlet is nearby.
Tip #3.
Remember Ventilation and Safety
Everything we do involves a level of risk, so it’s smart to assess yours and take precautions. If you’re going to be working with chemicals (paint thinners, glues, stains, etc.) that give off fumes, be sure your workspace has a window you can open when needed. Having a nearby water supply is helpful. Take the time to map out an emergency plan, so you are well prepared.
Tip #4.
Lighting Effects Work
When I was a kid doing homework at the kitchen table, my mom would walk by and flip on the overhead light for me. “It’s better for your eyes,” she’d say. Mom was right. Does your space have natural or overhead lighting? Would a small lamp be beneficial for you, and if so, where will that fit into things? It’s worth considering as you move forward with your new venture.
Tip #5.
Give Yourself Room to Grow
Starting small is starting smart, but don’t limit yourself or your imagination. Right now, my invention center is a table in the corner of the basement. Maybe one day it will be a super-techy-inspiring-for-inventors-everywhere place, but today, it’s a simple table with room to grow. And that, my friends, is not a bad beginning.
Until next time,
Invent your story
Adding pen and ink to your watercolor painting can really make your picture pop. I tried my first watercolor painting this year, and I immediately wanted to share what I learned with the kids. Although this art form is sophisticated (much more sophisticated than me!) it’s accessible to kids of all ages with supervision.
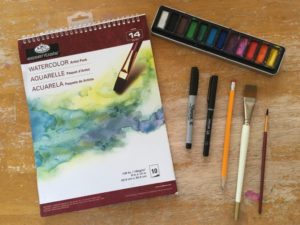
What you need:
- A big brush and a little brush
- A cup of water
- Watercolor paper
- Watercolor paints (we used a palette-style)
- An ultra-thin Sharpie marker
- A .05 micron (or comparable) pen for finer lines
- A pencil
The first think you do is choose your design. You can freehand a picture with a pencil (like we did in the featured image) or you can trace a design onto your watercolor paper.
Next, wet your paper with the big brush and begin to add the colors you want on your background. Try to keep the background water and paint separate from the area of your design. This will prevent unwanted color blending.
After your background looks the way you want it to, it’s time to use your little to color the details of your design. This can be as precise as you like. Less water produces a brighter color, and more water makes the colors soft/light.
Finally, when your painting is dry, you can color over your original pencil lines with the Sharpie marker or ink pen. You may decide to add more detailed lines that your original drawing didn’t include. Art has a way of taking on a life of its own, so enjoy the process and have fun.

I loved doing this project with my kids, because it introduced them to mixed media art. It was also a relaxing activity at the end of the day. I hope the children in your life enjoy it too!
Until next time,
Invent your story