
This seems like the easy part of creating an invention center – you just get the supplies you need. The thing is, without a method to the madness, it’s just madness. So here are three plumb line questions to keep you stockpiling instead of just making piles.
Does the material fit into the goal of your invention center?
I know I haven’t brought up the term “goal” in the context of your invention center before, but if you’ve come this far, you probably have a good idea of what yours is already. (If you haven’t read the first two posts on creating an invention center, you can read what it is and Part 1 to get caught up.) If you’re woodworking, you’ll need wood, screws, a drill, etc.
This is the no-brainer stuff to have around. Without a stocked area, you’ll get bogged down looking for that lost paintbrush or copper wire. This is why we’re making an invention center.
How much do you need to get started?
Sometimes the zeal to create can take over, and you end up with a lot more than you need – especially if it’s freebie stock. Like toilet paper rolls. There are tons of art and engineering projects you can do with toilet paper rolls. But if you keep saving and don’t use them, well it can just start to get weird.
There has to be a FULL point. Then move on.
Did you throw a wrench in your plan?
If the answer to the last question is “nope” – then it’s time to find that wrench and throw it into the stockpile! Hear me out on this one. If you want to create a maker’s space, that’s great, but this is a defining moment for your invention center. You want to have something in your invention center that challenges you to break the mold. More than something. A fair lot of things. An acorn from last fall’s hike. A bunch of rusty nails. One red sock.
These are the grains of sand that help your creative oyster make a pearl.
Until next time,
Invent your story
In my previous post, I promised to keep you updated on my invention center. Here’s my update: progress was slow. Why? I thought a lot about how to move forward with the space I have. Maybe I’ve been overthinking it. So, without further ado, here’s…
Tip #1.
Don’t Overthink It
Underthinking things in life (Can I afford this? Should I jump?) can get you into trouble. But overthinking is its own beast. Analysis paralysis is a real thing, so if you keep coming back to a space you have to work with and thinking, “That’s probably the best place to start…” it probably is.
That said, here are four more things to consider before making that final decision:
Tip #2.
Consider the Nature of the Work
If it’s electronics, you’re going to want a table and a nearby outlet. If it’s painting, an easel may be your best option. You also will want to consider the kind of floor you’re on. I want to do a little bit of everything and not destroy anything, so I went for a corner of our basement where the floor is painted concrete and an outlet is nearby.
Tip #3.
Remember Ventilation and Safety
Everything we do involves a level of risk, so it’s smart to assess yours and take precautions. If you’re going to be working with chemicals (paint thinners, glues, stains, etc.) that give off fumes, be sure your workspace has a window you can open when needed. Having a nearby water supply is helpful. Take the time to map out an emergency plan, so you are well prepared.
Tip #4.
Lighting Effects Work
When I was a kid doing homework at the kitchen table, my mom would walk by and flip on the overhead light for me. “It’s better for your eyes,” she’d say. Mom was right. Does your space have natural or overhead lighting? Would a small lamp be beneficial for you, and if so, where will that fit into things? It’s worth considering as you move forward with your new venture.
Tip #5.
Give Yourself Room to Grow
Starting small is starting smart, but don’t limit yourself or your imagination. Right now, my invention center is a table in the corner of the basement. Maybe one day it will be a super-techy-inspiring-for-inventors-everywhere place, but today, it’s a simple table with room to grow. And that, my friends, is not a bad beginning.
Until next time,
Invent your story
A couple of weeks ago, I visited the Mount Pleasant Discovery Museum. It’s an inspiring place that ignites the imagination and teaches through hands-on activities. I love the way they use color and texture in art. Check out Saturn!
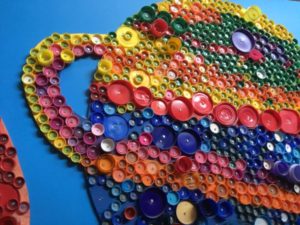
Planets from Plastic Lids
I’ve seen photographs and paintings of the planets before, but I’ve never seen them on display through reused plastic lids. Maybe I need to get out more. The mosaic effect of this eco-friendly idea is cool.

Touchable Light
Almost every corner of the MPDM had something to climb, count, throw, launch, build, or paint. Above this world of little lights, the sign said “Please Touch”. This display was neat because it was huge, and the cool, smooth textured light was a fun way to explore how color and light work together.
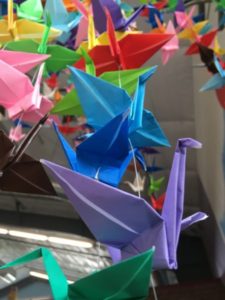
Colorful Cranes in Flight
The Japanese exhibit was probably my favorite. I loved watching kids paint the alphabet with water. The area was covered by a rainbow of hanging paper cranes, and it was absolutely beautiful. When I left the museum, I was ready to tackle a new colorful project of my own.
Every place has something to discover. Things we throw away can become unique art. Electricity is useful, but it can also be fun. A piece of paper can take flight when you get inventive and change its shape to create something new.
We live in a beautiful, diverse world. Every person carries wonderful colors, inside and out, that have a special place in the art that makes up our world. Wherever you go, and whatever you do today, take some time to soak up some of the beauty and be inspired.
Until next time,
Invent your story
If you like repurposed art, check out my experiment with pop cans for a new idea.

April showers bring May flowers, and I’ve been in a flower-making frenzy all month. These pop can tulips are a unique way to kick off summer and jazz up any empty corner of the house or garden. Let’s get growing!
What you’ll need:
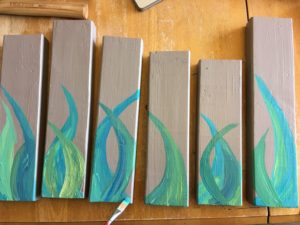
- A backdrop (I used painted 2×4’s)
- Pop cans (I used Coca-cola for the flower heads, and Verner’s for the green leaf cover)
- Aluminum foil
- Acrylic paint & brushes
- A sawtooth hanger (optional) & hammer
- Hot glue (I tried Elmer’s and even superglue, but I had the best success with hot glue)
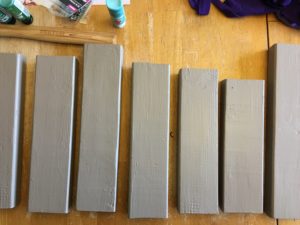
Paint Your Backdrop
The first thing you’ll want to do is set the stage for your flowers. If you want to replicate a real flower (like the ones featured) be sure to consider the shape of the leaves that grow on the plant. Tulips have nice thick leaves, so they were easy to paint. I like to mix colors for variety, so I mixed yellows, blues, and greens together and accented the leaves with a metallic acrylic paint.
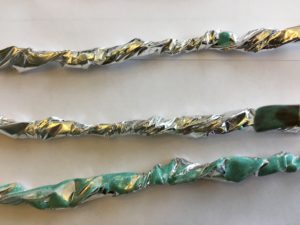
Twist Your Stem
After your leaves look the way you want, it’s time to make the stem. I ripped 3-4 inches of aluminum foil off of the roll and folded the edges in until I had a strip about 1 inch wide. Then, I started twisting in the middle of the foil all the way out to the ends. This created that nice 3D effect I was hoping for. You can also paint the stem if you want to – I did a light brushing with the metallic green.

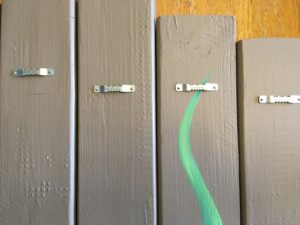
Attach Your Sawtooth
If you plan to hang your artwork up, be sure you have the sawtooth hanger (or whatever works best for you) attached to the back before you glue the flowers on the front. Aluminum is fun to work with because it’s versatile, but it also can get bent out of shape, so planning ahead is great.
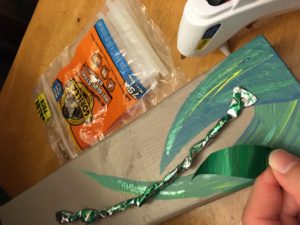
Cut Your Petals
I wanted a variegated look for my tulips, and the white swish on the coke cans was a perfect fit. It’s also one of my favorite beverages, so that’s fun. As you choose your colors/cans, look for a solid part that you can cut out and create a repeating pattern with. I used a Verner’s ginger ale can for the green leaf that covers the stem at the bottom of the flower.
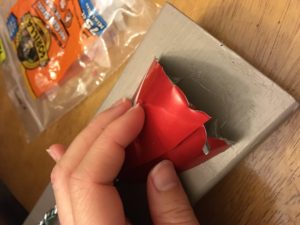
Glue Your Flower
When your stem, leaf, and petals look the way you want them to, go ahead and glue it all in place! I started with the stem and attached it to the wood at the top and bottom of the twisted strip of foil. Next, I used the green leaf to cover the foil edge. Finally, I glued two tulip petals over the top of each foil stem. Holding the flower head in place and using a LOT of glue helped to secure the petals.
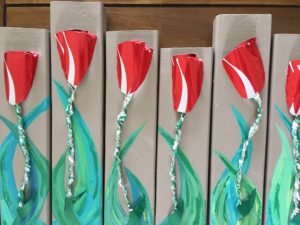
That’s it! Five easy steps to a foil flower frenzy. If you like this project, check out my first attempt at pop can art for a different spin. The best part about this artwork is each flower is unique. As your flowers come together, enjoy the fact that every one is an original work of art. Just like you.
Until next time,
Invent your story