I can’t take credit for the cool faces on all of these boxes. I have an artist in my home who learned this technique from a buddy. Since my son took it up, our home has exploded with fun faces that bust up the doldrums of household routines.

Just for giggles, here’s my how-to tutorial for Cereal Box Sharpie Art:
1.) Choose a cereal (or other) box.
2.) Grab a sharpie.
3.) Get creative.

How long has it been since you’ve given yourself complete creative freedom? When was the last time you recklessly abandoned the rules and thought, “What else could this be?” The ingenuity of this art form is its out-of-the-box thinking. Sorry guys, it just had to be punned.
Just in case you think I’m off my rocker, I’ll let you in on a little secret: I’m not a super-great artist. I love art, and I marvel at the classic, great artists who’ve earned every bit of their fame. But I am not, and will never be, one of those men or women.
I’m more of an “art-inspires-me-so-I-create” kind of artist. A lot of my work is just odd. I like it that way. But why in the world do I put it online for you to see and try for yourself?
Here’s the thing: I don’t care what category your profession falls under – healthcare, hospitality, computer software development, or waste management – every job needs innovative thinking. Are faces on cereal boxes innovative? Maybe, but they definitely shake things up, and they’re reminders.
Reminders that things can change.
So, if you’re stuck in any way, shape, or form in life, grab a sharpie and a box. Change it up! Remind yourself that even good things can be a little brighter when you add your creative thinking to them.
Until next time,
Invent your story

In my previous post, I promised to keep you updated on my invention center. Here’s my update: progress was slow. Why? I thought a lot about how to move forward with the space I have. Maybe I’ve been overthinking it. So, without further ado, here’s…
Tip #1.
Don’t Overthink It
Underthinking things in life (Can I afford this? Should I jump?) can get you into trouble. But overthinking is its own beast. Analysis paralysis is a real thing, so if you keep coming back to a space you have to work with and thinking, “That’s probably the best place to start…” it probably is.
That said, here are four more things to consider before making that final decision:
Tip #2.
Consider the Nature of the Work
If it’s electronics, you’re going to want a table and a nearby outlet. If it’s painting, an easel may be your best option. You also will want to consider the kind of floor you’re on. I want to do a little bit of everything and not destroy anything, so I went for a corner of our basement where the floor is painted concrete and an outlet is nearby.
Tip #3.
Remember Ventilation and Safety
Everything we do involves a level of risk, so it’s smart to assess yours and take precautions. If you’re going to be working with chemicals (paint thinners, glues, stains, etc.) that give off fumes, be sure your workspace has a window you can open when needed. Having a nearby water supply is helpful. Take the time to map out an emergency plan, so you are well prepared.
Tip #4.
Lighting Effects Work
When I was a kid doing homework at the kitchen table, my mom would walk by and flip on the overhead light for me. “It’s better for your eyes,” she’d say. Mom was right. Does your space have natural or overhead lighting? Would a small lamp be beneficial for you, and if so, where will that fit into things? It’s worth considering as you move forward with your new venture.
Tip #5.
Give Yourself Room to Grow
Starting small is starting smart, but don’t limit yourself or your imagination. Right now, my invention center is a table in the corner of the basement. Maybe one day it will be a super-techy-inspiring-for-inventors-everywhere place, but today, it’s a simple table with room to grow. And that, my friends, is not a bad beginning.
Until next time,
Invent your story
A couple of weeks ago, I visited the Mount Pleasant Discovery Museum. It’s an inspiring place that ignites the imagination and teaches through hands-on activities. I love the way they use color and texture in art. Check out Saturn!
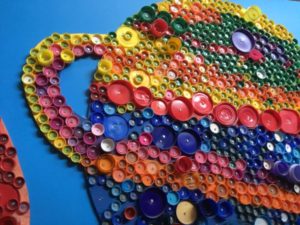
Planets from Plastic Lids
I’ve seen photographs and paintings of the planets before, but I’ve never seen them on display through reused plastic lids. Maybe I need to get out more. The mosaic effect of this eco-friendly idea is cool.
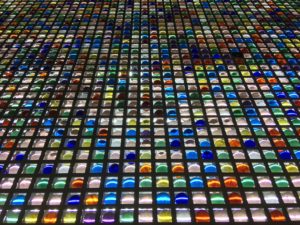
Touchable Light
Almost every corner of the MPDM had something to climb, count, throw, launch, build, or paint. Above this world of little lights, the sign said “Please Touch”. This display was neat because it was huge, and the cool, smooth textured light was a fun way to explore how color and light work together.

Colorful Cranes in Flight
The Japanese exhibit was probably my favorite. I loved watching kids paint the alphabet with water. The area was covered by a rainbow of hanging paper cranes, and it was absolutely beautiful. When I left the museum, I was ready to tackle a new colorful project of my own.
Every place has something to discover. Things we throw away can become unique art. Electricity is useful, but it can also be fun. A piece of paper can take flight when you get inventive and change its shape to create something new.
We live in a beautiful, diverse world. Every person carries wonderful colors, inside and out, that have a special place in the art that makes up our world. Wherever you go, and whatever you do today, take some time to soak up some of the beauty and be inspired.
Until next time,
Invent your story
If you like repurposed art, check out my experiment with pop cans for a new idea.


